How to Calculate IoT Solar Panel System and Battery for Solar IoT Projects?
- Richard Wang
- February 5, 2022
- 2:06 pm

Preface
When we deploy outdoor IoT projects, we often need to use solar energy to obtain electricity. Such projects are also called solar IoT projects. Here comes a typical question: How to calculate IoT Solar Panel System and Battery for Solar IoT Projects? The calculation and selection of solar panel and battery are very important, because this directly ensures that the availability of the entire system meets expectations and can balance the budget. An oversized IoT solar panel and battery configuration can certainly guarantee the availability of the system to a great extent, but the increase in the number of IoT sites will inevitably lead to an overly high overall budget. If the IoT solar panel and battery are configured too small, the availability of the system will be greatly reduced, thus affecting the KPI of the entire network. This article will introduce in detail how to calculate the capacity of a suitable IoT Solar Panel System and Battery.
Reference Video:
Table of Contents
1.General Scenarios of Solar IoT Projects
1.1 Simplified Scenaro and Topology of IoT Solar Panel System
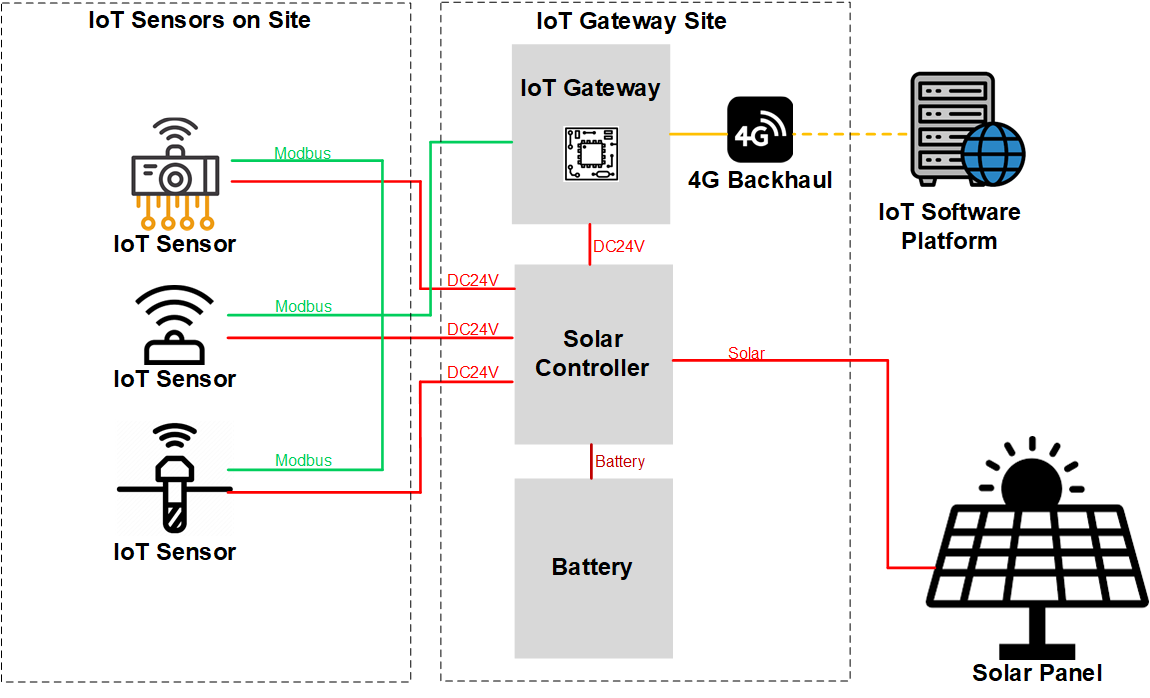
The above figure is a simplified model of an IoT solar site. An IoT Solar Panel System generally includes the following devices:
IoT Sensors
Different types of IoT sensors are equipped in IoT scenarios. In IoT solar panel systems, they are active devices and their power consumption needs to be calculated.
Solar Controller
As a core component in IoT solar panel systems, solar controllers are very important. Please note that we do not recommend using solar systems such as solar inverters. The main reason is that in IoT scenarios, almost all devices can be DC voltage devices. There is no need to use solar systems with AC voltage output such as solar inverters, otherwise it will greatly increase the size of the device, and multiple DC to AC and AC to DC conversions will lose the efficiency of power use. Using a solar controller with DC output is the best solution, and its output voltage is best in line with the voltage range used by IoT sensors and IoT gateways, thereby avoiding various DC voltage conversions.
The capacity of the solar controller needs to be determined by calculation, which we will introduce in detail in the subsequent chapters.
Battery
Battery is a core component in the IoT solar panel system, and it is often the component with the greatest cost impact in the entire system. You can choose to use Lead Acid battery or Lithium Battery. However, we generally recommend lithium battery. The main reason is that lithium battery is smaller and has higher energy density, which makes it easier to miniaturize the entire IoT solar panel system, thereby matching the deployment scenario of IoT sensor and reducing the transportation and installation costs of deployment.
Battery capacity needs to be reasonably planned, and the subsequent chapters will introduce how to calculate it in detail.
IoT Gateway
As the core component of control and network backhaul in the entire system, the importance of IoT gateway is self-evident. In the configuration, it is recommended that its power supply voltage match the output voltage of the solar controller. And in solar IoT projects, we recommend the use of low-power and high-efficiency IoT gateway to optimize the energy efficiency of the entire system, maximize the reduction of battery and solar panel capacity to facilitate the miniaturization of the entire system.
Solar Panel
As the core of the energy acquisition of the entire system, the solar panel is configured with appropriate capacity. Although solar panel is not expensive, an oversized solar panel will bring many additional problems. For example, solar panel is not easy to transport, and the large and heavy size will increase the transportation cost to the station. In terms of installation, the larger the solar panel, the more difficult it is to install at the site, and if it is located in a typhoon area, factors such as wind protection must also be considered.
The following chapters will introduce how to calculate the solar panel capacity.
1.2 Find Out Active Devices On the Site
In order to calculate IoT solar panel system and battery for solar IoT projects, we first need to find out the active devices at the site and calculate their total power consumption. Then we will use the simplified model just now to calculate the Edgeware IoT sensor as an example.
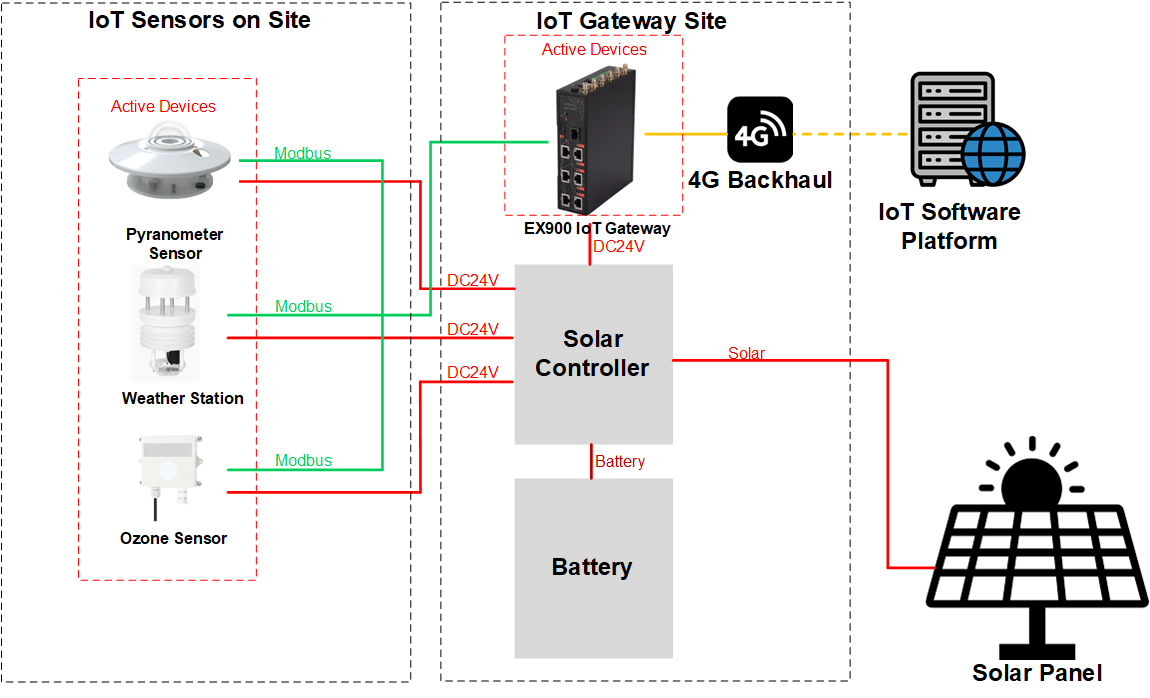
The above figure shows the topology formed after we substitute Edgeware’s IoT sensors and IoT gateway. If you want to query the specific information of these products, please click the following link:
First of all, we need to understand what active devices are. Simply put, they are devices that consume power in your entire system. The red parts in the topology above are active devices.
IoT sensors need to rely on solar controllers and batteries to power them, so they must be active devices. And they will become an important part of the power consumption of the entire system.
IoT gateway must also be an active device that consumes power. It is also the main power consumption part.
Because of the problem of solar energy conversion efficiency, the solar controller itself actually consumes a certain amount of power, which has little impact on the entire system, so we do not list it as an active device in the calculation.
The BMS system of the battery itself also consumes a certain amount of power, but it is also a very small impact. In order to simplify the calculation, we do not list it as an active device.
So in this system, three IoT sensors and one IoT gateway are the active devices that we need to care about. The first step is to find out their power consumption, which can usually be found in the product manuals of different manufacturers. For example, in the catalog of the Weather Station in this topology, we can find its power consumption as follows:
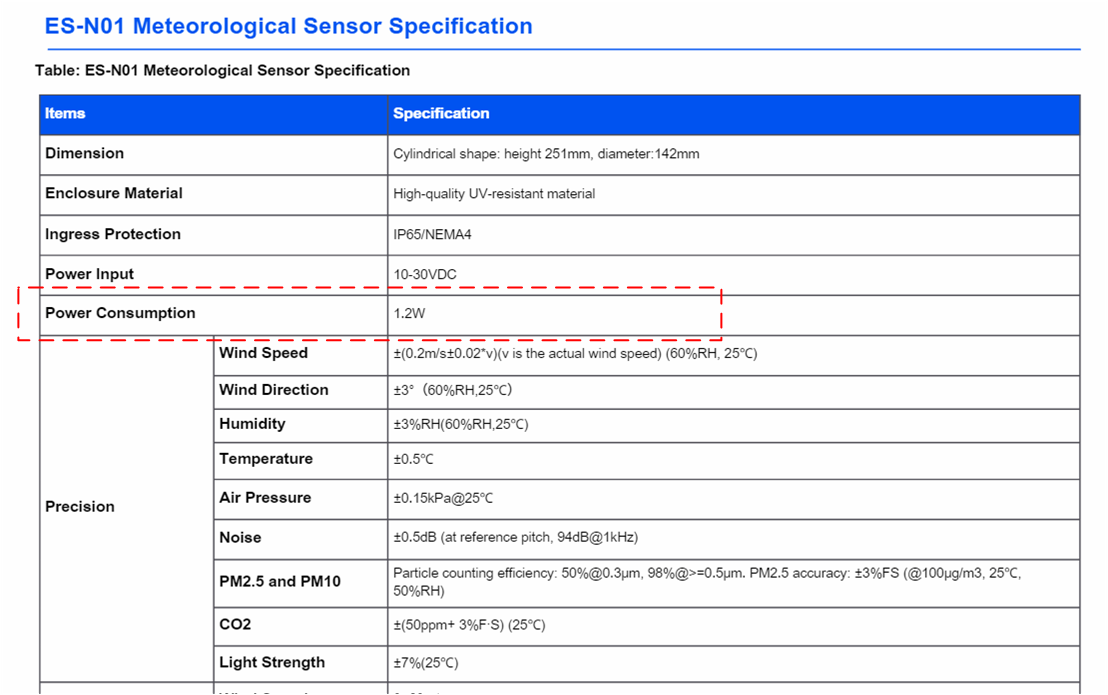
So from the above figure we can know that the power consumption of the weather station is 1.2W. Similarly, you can query the power consumption of IoT gateway, Pyranometer Sensor, Ozone Sensor, the steps and solutions are the same. Then we can get the following power consumption summary table:
Table 1-IoT Solar Panel System Active Devices and Power
Device | Quantity | Power(Watts) | Total Power(Watts) |
EX900 IoT Gateway | 1 | 4W | 4W |
Pyranometer Sensor | 1 | 1W | 1W |
Weather Station | 1 | 1.2W | 1.2W |
Ozone Sensor | 1 | 0.1W | 0.1W |
Grand Total(Watts) | 6.3W | ||
2. Calculate Battery Capacity for Your IoT Solar Panel System
2.1 Choose the Correct Battery Type for IoT Solar Panel System
There are three common types of batteries on the market:
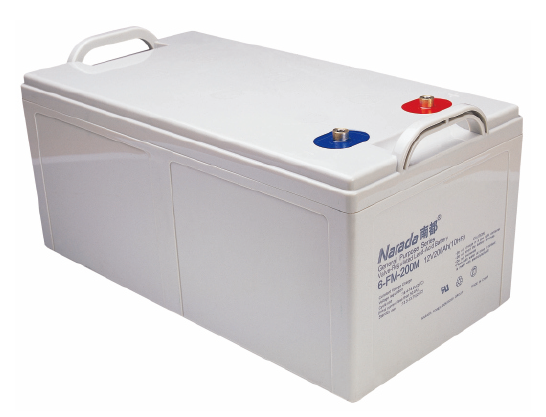
(1) Lead Acid Battery (GeL)
Such batteries are relatively common in the market. The advantage is stability and lower price. The disadvantage is that the suitable operating temperature is 25°C, which is not easy to reach when deployed outdoors. And the charge and discharge cycles of Lead Acid Battery are basically around 600 times. Assuming one charge-discharge cycle per day, the battery needs to be replaced in less than two years.
Another problem with lead acid batteries is that they are heavy and large. As we can see from the IoT solar panel system scenario, their power is relatively small, and the IoT sensor devices are also small. Therefore, using lead acid batteries will make the entire IoT solar panel system larger and heavier. This will increase the transportation and installation costs of the entire solar IoT project.
(2) Customized Lithium Battery Pack
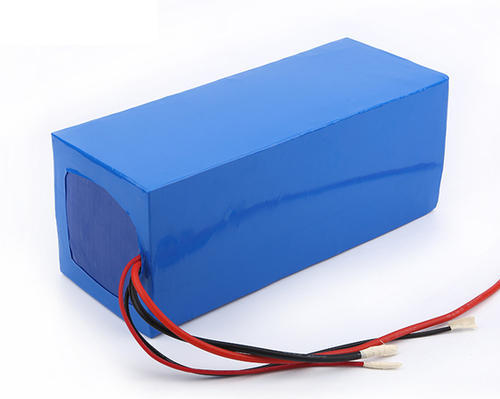
The lithium battery pack has a higher energy density, and the same capacity will be much smaller than the lead acid battery. In addition, based on our power calculation of the active device in the IoT solar panel system topology, the power of the entire system is 6W. For very small load power, the use of a customized lithium battery pack will make the battery very small, and the capacity can be customized to meet the system load requirements, not too large or too small. And different projects will use different battery voltages, which can be configured according to project requirements.
We generally recommend that the IoT solar panel system use a lithium battery pack.But please note that it is best if the battery is designed with a BMS system, so that the IoT gateway can be used to read the battery management information through modbus to better monitor and manage the entire system.
(3) Standard 19 Inch Rack Mountable Lithium Battery
This type of battery is obviously not suitable for IoT solar panel systems. This is because this type of battery is mainly used in standard scenarios such as solar energy storage, Telecom system, UPS system, etc. Most of the batteries in these scenarios have very large capacities such as 50AH, 100AH, 200AH, etc. However, the power of IoT solar panel scenarios is very small, and it is not suitable to use these batteries in terms of cost, device size and weight.

2.2 Understand Battery Capacity-Wh kWh and Ah
The following content is very important to understand how to calculate solar panel and battery for IoT system, please read it carefully.
After selecting the battery type, we need to start calculating the battery capacity we need. First of all, we need to know that the value to indicate electrical energy is Wh (watt hour) and kWh (killowatt hour). kWh is a common unit that you pay for your electricity bill at home.
1000Wh=1kWh
But we often see Ah in the battery capacity label, which is a bit confusing. Ah means Amp hours. It means how many amps the battery is able to deliver in one hour. So 20AH means 1 hour at 20A or 10 hours at 2A.
Note that the voltage is introduced when we calculate the charge of the battery. For example, there is a 12V100Ah battery, and its power is calculated as follows:
Battery Voltage*Battery Amp Hours =12V*100Ah=1200Wh=1.2kWh
So suppose we have a 48V100AH battery, its power is calculated as follows:
Battery Voltage*Battery Amp Hours =48V*100Ah=4800Wh=4.8kWh
You can find that the same battery is 100AH, the voltage is different, the power is different. When you use different solar systems, according to the different voltage configurations of the batteries required by the solar controller, the voltages of the battery packs you configure are different, but the overall formula for calculating the power is in accordance with:
Battery Voltage*Battery Amp Hours= Battery Electricity Amount
When configuring the battery pack, pay attention to the configuration according to the battery voltage required by the manufacturer.
2.3 Battery Capacity of IoT Solar Panel System Calculation
When we configure the battery, we first need to clarify the system autonomy time we expect. System autonomy time in the IoT solar panel system scenario refers to how many hours the system can run on the battery when the solar power is not available. This value needs to be set according to the actual situation of the scenario. Setting it too large may put too much CAPEX into the battery. If the setting is too small, it may affect the availability of the system. Generally, the following two situations will cause solar power is not available:
(1) Weather
In general, if the weather is cloudy, rainy, snowy, and other days without sun, the output of solar energy may only be between 10% and 0.1% of the designed capacity, and the system has to rely on batteries to run.
(2) Evening
The night time system must operate 100% on batteries if it needs to operate normally.
The setting of system autonomy time has a great relationship with local weather, rainfall and IoT solar panel usage scenarios.
In this scenario, we assume that a battery of 72 hours of system autonomy time is required.
Table 2-IoT Solar Panel System Active Devices and Power
Device | Quantity | Power(Watts) | Total Power(Watts) |
EX900 IoT Gateway | 1 | 4W | 4W |
Pyranometer Sensor | 1 | 1W | 1W |
Weather Station | 1 | 1.2W | 1.2W |
Ozone Sensor | 1 | 0.1W | 0.1W |
Grand Total(Watts) | 6.3W | ||

According to the table we calculated earlier, we know that the power consumption of the entire IoT system is 6.3W. And the IoT gateway and IoT sensor use DC24V voltage. So the most appropriate solar controller for us to configure at this time should be a DC24V solar controller. So the battery voltage is also determined to be DC24V. According to the 72 hours of system autonomy time we set, let’s calculate the battery capacity that needs to be configured.
(1) First calculate the total electricity required to fill the battery
Total power of the system is 6.3W. If we need to maintain 6.3W operation for 72 hours, the electricity we need is as follows:
Max System Power(Watt)*Time(Hour) =6.3W*72Hours= 653.6Wh =0.6536kWh
(2) Calculate the Amp Hours that need to be configured with batteries
As we mentioned in Section 2.2, Amp Hours are related to voltage. We need to be clear of the battery voltage of the solar controller. In this case, our solar controller battery voltage is 24V, then we can calculate the battery’s Amp Hours as follows:
Electricity Amount Needed/Solar Battery Voltage=653.6Wh/24V= 27.23Ah
(3) Pay special attention to reserve 20% more battery capacity than the required battery capacity to avoid deep discharge
We have calculated that a 24V27.23AH battery is required, but this is not the final value. Generally, in order to avoid deep discharge of the battery and prolong the life of the battery as much as possible, we will configure 20% more capacity.
Amps Hour Needed*1.2=27.23Ah*1.2=32.676 Ah
So far we have concluded that we need a 24V32.676Ah battery. So when you order a lithium battery pack from your provider, you need to consider battery bigger than this value . Let us say 24V35AH will be fine.
3. Solar Panel Capacity Caculation for IoT Solar Panel System
3.1. Solar System Working Mechanism
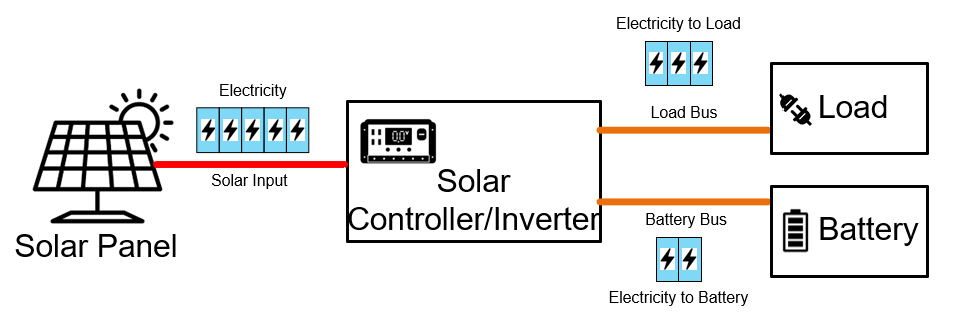
In order to understand how to calculate solar panel capacity for solar IoT projects, we need to understand the mechanism by how the solar system works.The above figure shows a simplified working principle of the solar controller for easy understanding. When the solar panel generates electricity, the electricity is distributed to the load and the battery through the control of the solar controller. Under normal circumstances, power will be preferentially supplied to the load, and the remaining power will be supplied to the battery to charge. Therefore, when calculating the solar panel capacity, we need to consider that the load needs to consume power, and at the same time, we need to charge the battery.
3.2. Battery Charge Time Assumption
Battery charge time is a key assumption. That is, how long does it take for the entire IoT solar panel system to fully charge the battery on a sunny day. It can be imagined that the faster the battery charge time, the better the availability of the entire system, and the stronger the ability to resist the system’s power exhaustion caused by bad weather. On the contrary, the system has a greater risk of exhausting the battery.
To speed up the battery charging speed, you can increase the solar panel capacity, but it is impossible to increase the solar panel capacity endlessly. It is subject to many conditions.
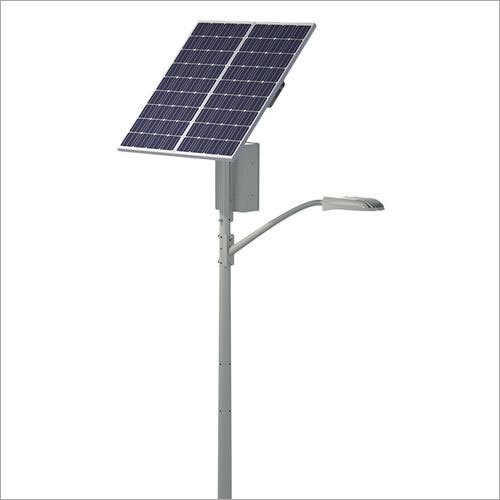
- Too large a solar panel is not match to the miniaturization of the IoT solar panel system
IoT sensors and IoT solar panel systems can be very small and lightweight if they are well designed, making them easier to deploy. However, if the solar panel is too large, the entire system will be too large, which is disadvantageous in terms of finding an installation site or in terms of transportation and installation.
- A solar panel that is too large will cause the pole to vibrate, thus affecting the measurement accuracy of the IoT sensor
IoT sensors such as vibration sensors, wind speed sensors, and wind direction sensors will not affect their measurement accuracy if they are subjected to severe shaking and vibration. However, when a pole is hung with a large solar panel, the wind will cause the entire pole to shake and vibrate. Not to mention the impact of extreme weather such as hurricanes.
Based on the above reasons, it is very important to choose a solar panel suitable for solar IoT projects. Choosing the right solar panel is directly related to our decision of battery charge time. So just choose the right time to fully charge the battery, and don’t define a target that is too crazy. Generally speaking, setting the battery to be fully charged for 8-12 hours of sunlight is faster.
In our case, we set 12 hours of sunlight to fully charge the battery.
3.3. Solar Panel Capacity Caculation for IoT Solar Panel System
3.3.1 Find Solar Resource Potential On Your Site
Because the IoT solar panel system scenario does not require accurate data like a large-scale solar power station, we can use some free data to estimate the approximate solar resource potential of our site.The Edgeware pre-sales team obtained this data from solar GIS. Solar GIS solar energy resource query website is as follows:

When you select the country where the project is located, you will get the corresponding solar resource map. We assume that this calculation is in Colombia, then we get the following map:

Assuming our site is located in Cali, Colombia, we can read from the above figure that Cali’s solar resource potential is 5.2kwh/m3. This is an important value for calculating solar panel capacity.
3.3.2 Method of Solar Panel Capacity Calculation
Based on the series of data calculated or assumed above, we list them in the following table:
Table 3-IoT Solar Panel System Battery and Solar Panel Calculation Table
Max Load Power | System Autonomy Time | Battery Capacity Needed | Battery Charge Time Target | Horizontal Irradiation On the Site | Solar Panel Capacity | |
Parameter | 6.3W | 72 Hours | 24V35AH | 12 Hours | 5.2kWh/㎡ | To be defined |
Total Solar Power Needed
According to our description in chapter 3.1. Solar System Working Mechanism, we need to consider two aspects of power
(1) Battery charging requires power
(2) The power consumption of the system load (in the case of the time with sunlight, the load is powered by solar energy)
First let’s look at the battery, we have a 24V35AH battery, then its total power is calculated as follows:
Electricity Amount of Battery = 24V*35Ah=840Wh
The maximum system load has been 6.3W
Because we assume that the sun shines for 12 hours to charge battery fullly, then during these 12 hours, the system load is powered by solar energy, and the total electricity of the load required:
Electricity Amount of the Load =6.3W*12Hours = 75.6Wh
So in the end we can get the electricity we need to generate during 12 hours of sunshine:
Electricity Amount Gran Total =Electricity Amount of Battery+ Electricity Amount of the Load = 840Wh+75.6Wh = 915.6Wh
Average solar power we need in 12 hours of sunshine:
PSolar=915.6Wh/12hours=76.3W
This value is important for our subsequent calculations.
Solar Panel Configuration Calculation
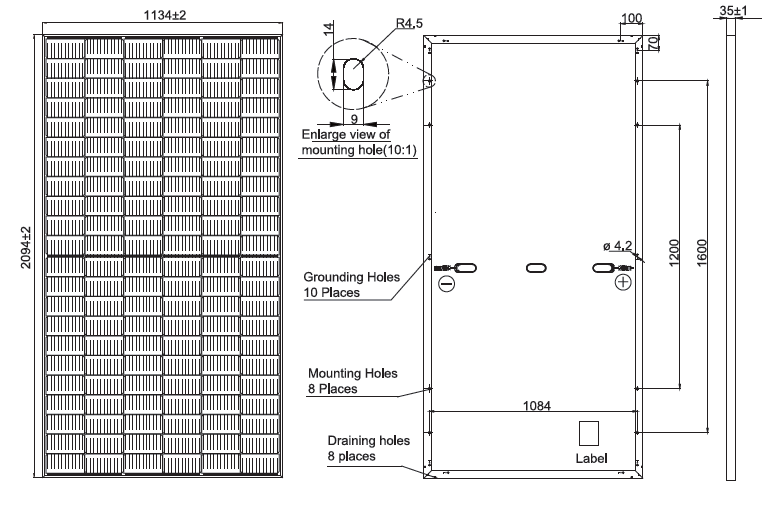
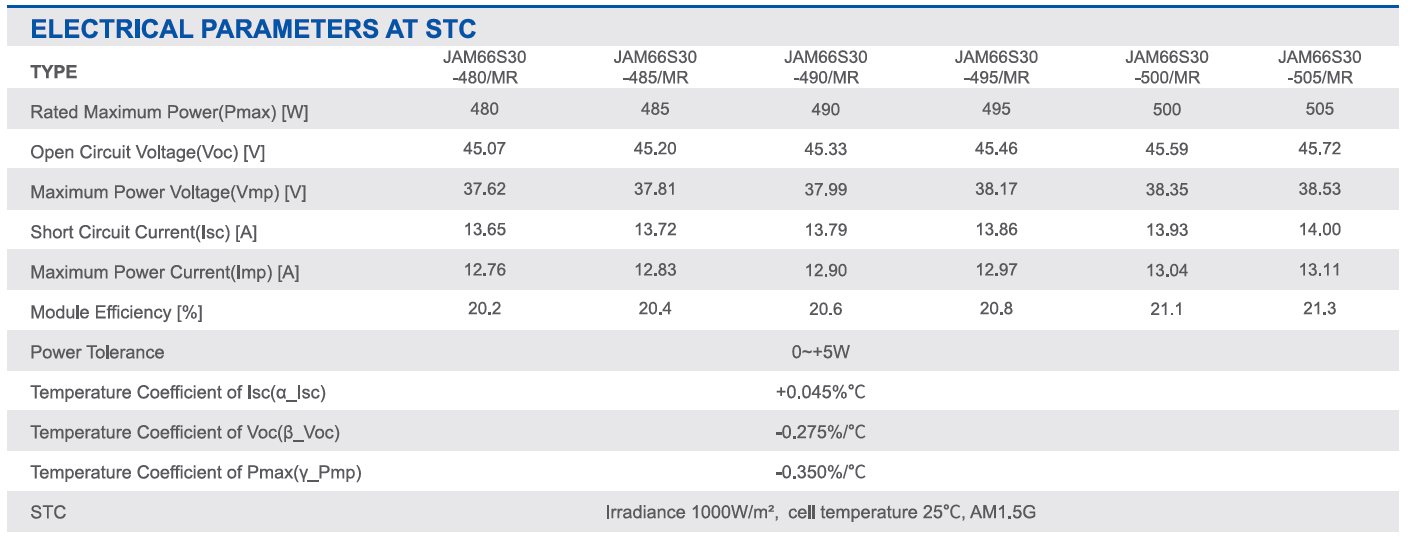
The picture above shows us taking JA Solar’s solar panel as an example. You can see that there is a parameter Module Efficiency, which is very important. We need to know that the radiation of sunlight irradiating the solar panel is not 100% converted into electrical energy. The general conversion efficiency is about 20-21%, and we will take 20.2% for subsequent calculations.
In addition, we have just known that the horizontal irradiation on the site is 5.2kWh/㎡ per day. It can be found that this parameter is related to the area. It’s easy to understand that the larger the area the sun hits, the more energy it gets. The larger the solar panel and the larger the area, the more solar irradiation will be obtained. The area information can be obtained from the solar panel manufacturer’s catalog.
According to the condition that we know that the horizontal irradiation on the site is 5.2kWh/㎡ per day, we can calculate the solar power per square meter:
PSolarSqm =Horizontal Irradiation per Square Meter * Area * Module Efficiency / Sunshine Hours=(5200Wh/㎡ * 1 ㎡ * 20.2%)/12 hours =87.53W
According to the calculations in the previous chapter, the solar power we need is PSolar=76.3W,Then we can figure out how many square solar panels we need:
Solar Panel Area Needed= PSolar/PSolarSqm= 76.3W/87.53W ≈0.872㎡
According to the situation of the JA Solar solar panel just now, the area of 480W = Width*Height= 2.094m*1.134m=2.375 ㎡, so we can estimate that the IoT solar panel capacity we need = (0.827㎡/2.375 ㎡)*480W ≈ 176.2W
Table 4-IoT Solar Panel System Battery and Solar Panel Calculation Table Final
Max Load Power | System Autonomy Time | Battery Capacity Needed | Battery Charge Time Target | Horizontal Irradiation On the Site | Solar Panel Capacity | |
Parameter | 6.3W | 72 Hours | 24V35AH | 12 Hours | 5.2kWh/㎡ | 176.2W |
4.Temperature and Climate
4.1 Temperature
Please note that the calculations in the previous section are theoretical calculations for the IoT solar panel system. However, in reality, the temperature difference between the areas where solar IoT projects are deployed can be very large.
Particularly hot areas
In the desert areas of the Middle East, the room temperature can be as high as 55°C. Special considerations need to be made for heat dissipation in such environments. When you need to use additional heat dissipation devices for heat dissipation, such devices are active devices and they also consume power. You need to include their power consumption in the power budget of this system.
Particularly cold areas
Some areas are cold in winter, such as the northern United States. The temperature can drop below -15°C in winter, which will affect the charging and discharging of the battery. In this case, a heater is often required to ensure the normal operation of the entire system. The heater also consumes power and is an active device, so it needs to be included in the power budget calculation of the system.
4.2. Climate
Although the theoretical calculations have been completed in the previous article, the actual situation still needs to be considered in combination with the local climate. For example, taking the site we chose, Cali, Colombia, as an example, we need to pay special attention to its rainy and dry seasons.
There are many free websites for weather data, and colleagues at Edgeware are generally used to querying the following free websites:
For example, if we query Cali in Colombia, we can get the following data:
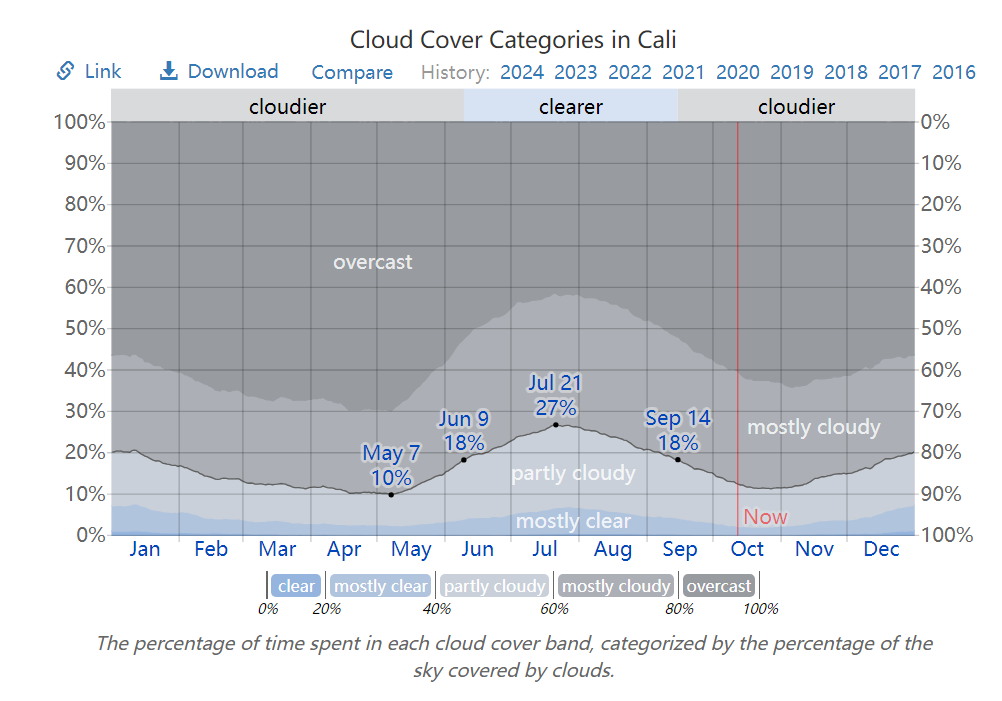
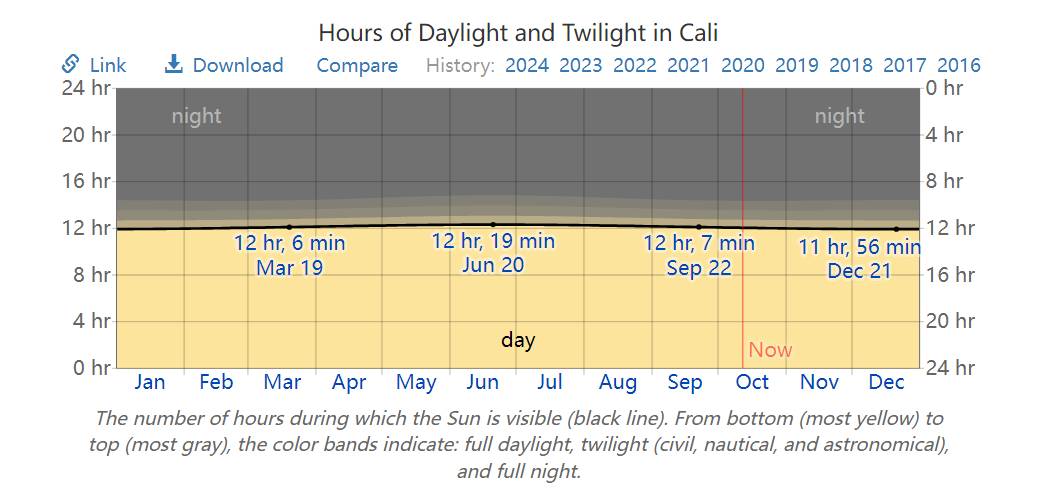
Any theoretical calculation needs to be combined with your actual experience at the site. For example, in our case, the city of Cali in Colombia is located in the mountains and it is often cloudy. We need to combine these practical experiences to consider how to configure the batteries and solar panels of the entire system. From this case, it seems that the capacity needs to be appropriately enlarged.
5.Conclusion
Calculation of IoT Solar Panel System and Battery capacity is extremely relevant to the overall availability, reliability and deployment cost of IoT solar projects. It is recommended to do these theoretical calculations before each project in order to achieve a good balance between investment and performance before the project is deployed, thereby ensuring the success of the project deployment.

